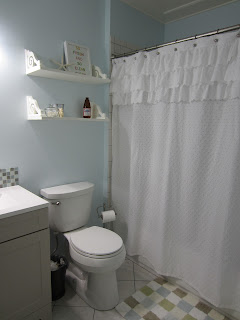
this week of the bathroom project just so happened to coincide with a "recovery" week of the p90x program. Mark decided to take advantage of this, and turned it into a full fledged "off" week instead. this way, he was able to make good use of his evening hours during the week, not have to spend any extra time or energy working out, and really was able to make some impressive progress on the bathroom.
first up: finishing the beadboard ceiling. all the calculations and measurements that Mark did were to ensure that the beadboard would be nice and square and centered once it was installed. this meant that the 4x8 panel needed to be trimmed on all four sides before it could be installed.
as far as the actual installation went, we used adhesive followed by some finishing nails. Mark applied the adhesive directly to the ceiling instead of putting it on the back of the actual beadboard panel. this meant that there was WAY less chance of us making a mess of ourselves or anything else that we might have accidentally bumped into as we maneuvered the panel into place on the ceiling. and yes, we did manage to make this work as a two person job, although i think having an extra set of hands might have been helpful, if a little bit of a tight squeeze in this tiny space.

based on the placement of the joists in the ceiling, there wound up being nothing solid on the short ends of the room to nail the beadboard into. to keep the beadboard as flush to the ceiling as possible and keep the ends from flopping around, the two short pieces of quarter-round trim had to pull double duty: not only would they be decorative and pretty, but they would also be nailed into the 1x8 trim boards to help hold the ends of the beadboard up and in place.
just in case you were wondering, this is NOT the correct way to install mitered quarterround trim pieces. its not that the miter is cut the wrong direction, its just that these ones got installed upside down. whoops.
if you happen to be in a rush, it is very possible that this could happen to you. if this is the case, be very glad you chose to attach your trim with just nails instead of with glue. this will make removing your newly installed trim pieces
slightly less rage-inducing.
we left the upsidedown trim pieces in place until the glue on the beadboard had dried, then Mark figured out a way to remove them without damaging any of the other ceiling pieces. this was key, as it meant that we had only wasted a $4 piece of trim and a couple hours instead of trashing the entire ceiling.
once we had that whole 'which way is up' issue resolved, the rest of the trim pieces went in without any issues. Mark chose to wear gloves to help minimize the amount of dirt and fingerprints he would have to clean up and/or paint over later.
with all the trim pieces in place, Mark moved on to the task of verrrry carefully cutting away the beadboard around the exhaust fan. he decided it would be easier to do this after the beadboard was on the ceiling, instead of cutting a giant hole based on measurements alone and then hoping that it fit right once we put it up there. he's a thinker that husband of mine.
he made this look so easy. even so, i couldnt watch. there were just too many things that could have gone wrong. lost fingers, a bad cut, a slip and fall... it was way less stressful for me to just be in the other room. close enough to be there within seconds of a big crash, but far enough away to protect both our sanity.
with a few finishing touches: nail holes filled and touch up painted, all gaps caulked, TA-DA! we have ourselves a beautiful new beadboard ceiling!
but wait! theres more!
Mark also installed a weird looking partial piece of baseboard real quick-like. why just that one piece? why is it cut so funny? why was he in such a hurry that he needed to dry the caulk with my hair dryer?
well, that one piece of baseboard was the only one that was needed before he could...
*drumroll please*
...install the vanity!
oh, and he put up the lovely new light fixture too. sorry about the total lack of in-process pictures. i was busy making the most of the gorgeous weekend weather to do some much-needed-pre-winter yard work
(mowing and leaf mulching, cleaning out some flower beds, and trimming a few bushes) and since our lawnmower is broken, this was especially exhausting and i needed all my energy to make it through the entire yard, and i also didnt want to take any unnecessary picture breaks because i didnt want to run out of daylight.
but since mark was on a roll this week,
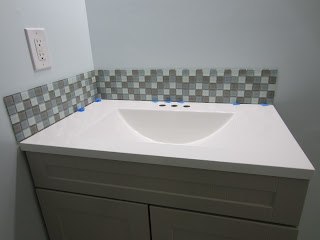
(and also because he needed to return his uncles tile saw soon) he decided to take on the last tile-related project: the backsplash and sidesplash.
the installation was very similar to what we've seen before:
- lay out your pattern, cut your tiles, and mix the mud
(thinset this time)
- spread the mud onto the wall with the notched trowel. use a trowel with smaller notches for smaller tiles.
- press your tiles into the mud. clean up the extra mud from around the tiles and out of all the grout lines.
- use little blue wedgie spacers to keep the tiles from sagging down the wall while the mud sets.
- jump up and down with excitement and joy at your beautiful backsplash!
seriously. look. how. stinkin'. pretty. this tile was not part of the original "design scheme" for the bathroom, and i am absolutely thrilled with how well it matches and complements the wall color and also pulls in the grayish color of the vanity. if i didnt tell you, would you even guess that it was purchased late in the game and straight off the shelf at the Depot? i love it so hard.
all the vanity needs to be called complete is some plumbing and doorknobs, both of which are things we have in our possession, and are itching to install just as soon as the tile is grouted and ready to roll.
only one more big thing left to purchase and install in the bathroom: the toilet. i did some research, and i thought we had one all picked out, but now there is debate between the members of my household: round bowl vs. elongated. a few people chimed in with their opinions on facebook, but since most of them sided with me, Mark decided that we need more responses in order to make an informed decision.
so what say you, internets? round or elongated?
trips to Home Depot: this week - 2. total - 18.
trips to Ace: this week - 0. total - 2.
trips to Lowes: this week - 3. total - 7.
times Amanda has cried over this project: this week - 1. total - 3.
times Amanda has cried in Home Depot: this week - 0. total - 0.
days until Thanksgiving: 9!


