Showing posts with label drywall. Show all posts

Friday, January 8, 2016

guest room update: drywall.

want to see something cool? suddenly, thanks to internet magic and the fact that I haven't posted an update in over a month - we have a real wall in the guest room!
 
front room, from the new hole in the wall. 

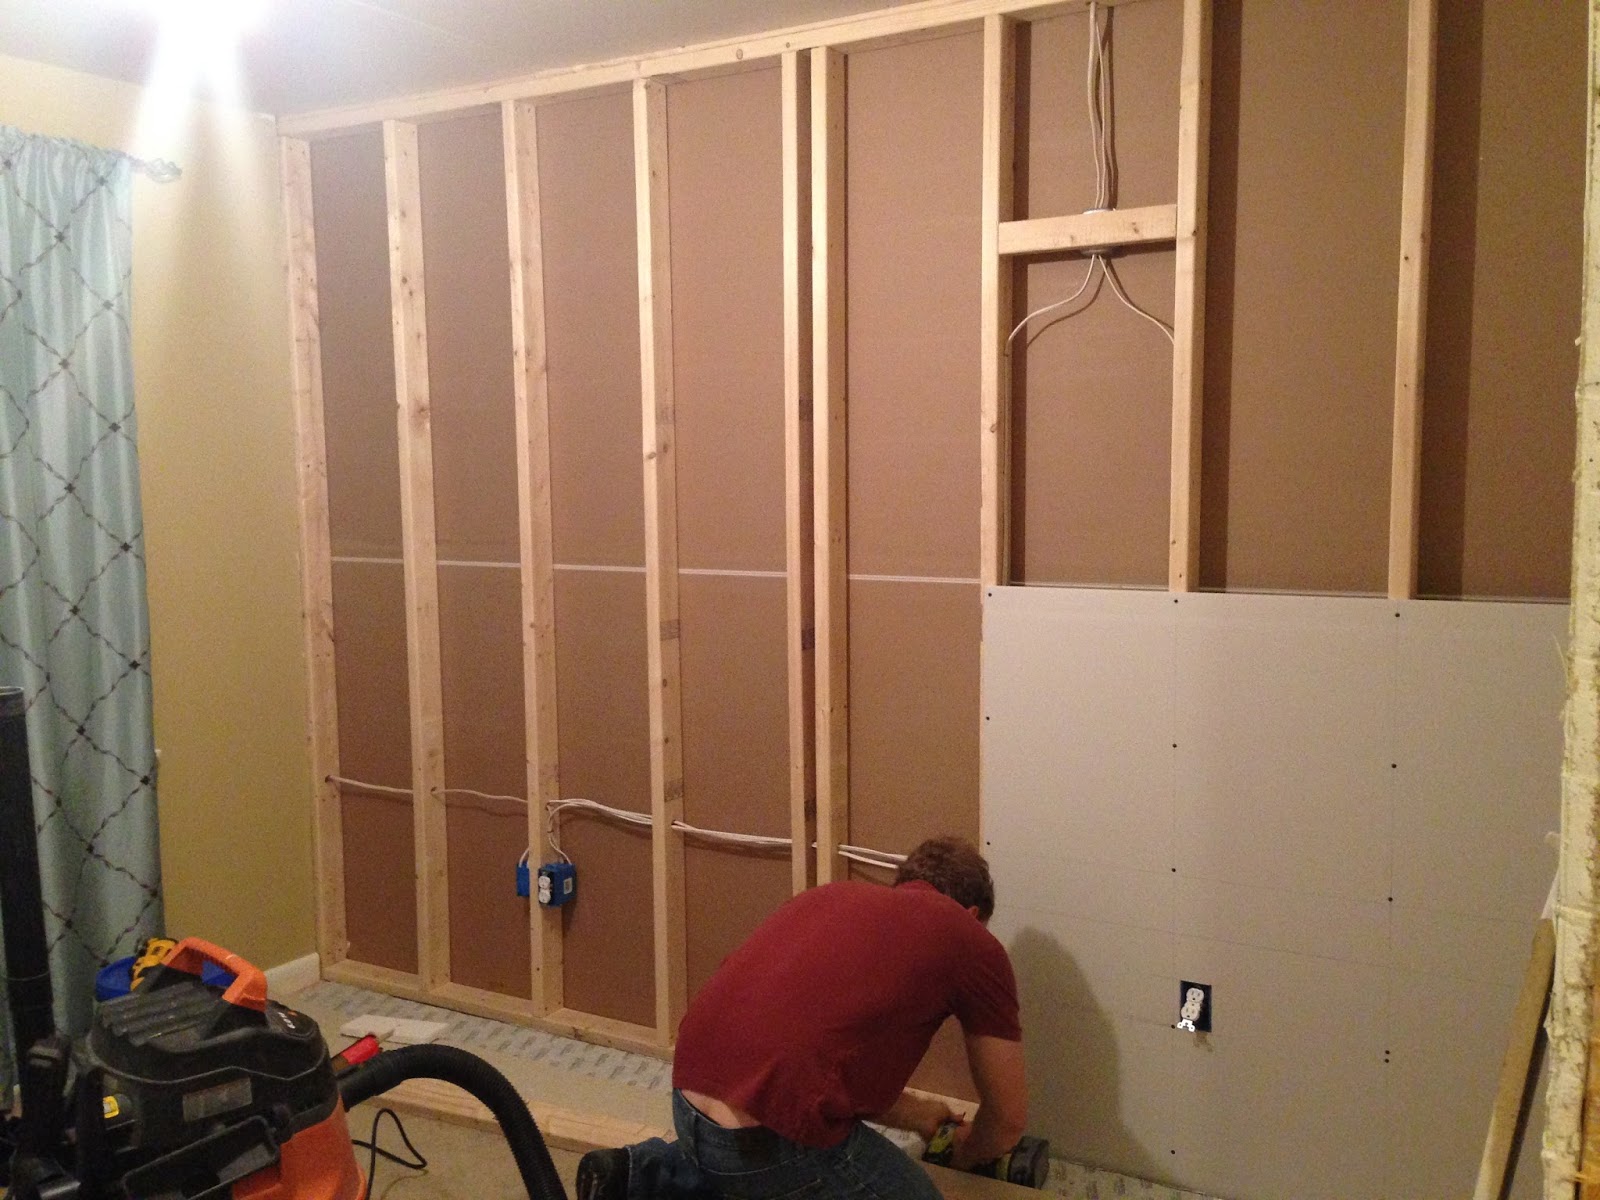
truth is, Mark gets all the credit for this. he has been working on this project pretty much every available minute he has on nights and weekends: drywalling, spackling, sanding, and priming. He focused his efforts primarily on the back room, to make sure our friends had a place to sleep that wasn't the couch when they came to visit the weekend before Christmas. as it was, we were able to provide them with four complete walls, a complete ceiling with a proper ceiling fan/light combo, a door, and a bed! well, a mattress on the floor, but still.

from the hallway, the view into the guest room hasn't changed all that much:


but once you step into the room, that new wall makes a big difference.


I'm starting to really get excited about these two rooms. I think it will make our house make a lot more sense, and add a lot of functional space that was lacking when this was all one big room.

 Now that the holidays are over, Mark has been able to keep working in the front room, and basically has it done to the same point as the back room.  if all goes well, we might be able to get some real paint on the walls this weekend!

Monday, November 30, 2015

project update: the guest room.

there is something about fall - the cooler temperatures, the evening darkness, the upcoming holiday season - that apparently makes it feel like the perfect time to start a new house project. in fact, we have had some sort of renovation project going on in our house every fall/winter we have lived in it:
  • in the fall of 2010, we had just bought our house and immediately drywalled the master bedroom ceiling, re-carpeted and painted the two bedrooms, and painted the master bathroom.
  • 2011 had us wrapping up the updates to the fireplace room and painting ALL the things.
  • in 2012, we completely re-did the hall bathroom in time to host Thanksgiving at our house.
  • 2013 was apparently an 'off' year, but only because we spent the winter studying for our professional licensing exam.
  • and then last year, Mark built us a new bed frame, and we completely overhauled the kitchen, living room, and dining room over the winter.
so this year, we managed to find a new room in the house to tear apart and put back together over the colder months: the guest room. 

before photo taken after the room was mostly cleared out

when the house was originally built, this room was actually two separate rooms, with a wall between the two windows, just to the left of the vent visible in the above picture.  previous owners of the house had at some point removed the separating wall, closed off the second doorway, and added a larger closet to the room. this configuration was great for the teenage girl who lived in it as her own private suite, but for our little family it makes sense to restore the original floor plan and split it back into two rooms.


this involves removing the closet, adding a new wall, adjusting the wiring, installing a new doorway, and re-doing the carpet in the one room.  we are also taking advantage of having everything torn up to drywall over the textured ceilings in both rooms, the only remaining ones in the house, which Mark has despised from day one.


so far, the closet has been demo'ed, the wall is framed up, the wiring is all roughed in for the overhead light and outlets in the new wall, and we have the drywall installed on the ceiling.  the next steps are to cut the rough opening for the new door, and install the drywall on the new wall.

not shown: completed wiring and drywalled ceilings.

we're not really working with a set deadline in mind at the moment, although we do have some friends coming to stay with us the weekend before Christmas. so maybe we should shoot to have a room with a door that they could sleep in at least mostly complete by then? I think its totally doable. right? because our basement room currently looks like this:


yeah. not exactly a functioning backup guest room at the moment. but no worries Julie - we've got this. please don't change your travel plans. I miss you and need more of you in my life.


Tuesday, June 12, 2012

lessons learned: drywall.

so as i mentioned last week, i spent my (gorgeous, sunny, HOT) weekend in the basement attempting to tackle the mountain-o-junk, our disorganized office area, and its less-than-functional closet. i made progress on all of those things, but none of them are quite done yet. because in order to truly finish any one of those projects, we had to take care of the elephant in the room: the moldy corner.

this corner of our basement got wet last fall during the hurricane. it was the only part of our basement that got wet, and we were happy to ignore it for a while. but this past weekend, i decided that it was high time we got around to fixing that, since it needed to be done if we wanted to paint the office. the hubs helped me with the icky demo parts on Friday night, but since he already had plans to be super busy all day Saturday working in the master bathroom, the rebuilding part of this project was going to be all me.

 this is what i learned from my first solo foray into drywall.

1. defective downspouts are never a good idea. this is especially true during a hurricane.


2. water in the basement + drywall = wet moldy mess.


3. bleach water will kill mold. it will also discolor your carpet. beware of drips.


4. dehumidifiers are da bomb-diggity. extra bonus points if they came with your house for free and have saved your basement multiple times in the past few weeks.


5. cutting drywall down to size is empowering and awesome. dont be embarrased to jump up and down and squeal with delight after you make your first cut.


6. don't get too cocky about your beautiful drywall installation. chances are, you forget to replace the insulation first and now you have to take it all back apart and start over.

7. always cut insulation from the kraft paper side. its easier and much less itchy. (and when your husband tells you this, just pretend that you knew that all along... you just like a challenge.)


8. you can push as hard as you want, but that screw is not going anywhere if your drill is set in reverse.


9a. your husband may tell you that taping and spackle-ing is simple and easy and that you'll have no problem with it...


9b. your husband is a liar. as soon as you proudly show him your handiwork, he will tear it all apart and tell you to try again tomorrow. to his credit, he will also apologize, which actually does help a little considering he just smashed all your drywalling hopes and dreams against the rocky shores of reality.


 10. if at first you don't succeed... just get your husband to do it.


still on my office/basement to-do list:
- finish spackling/sanding the corner.
- paint.
- install baseboard?
- get a new desk.
- move the futon into the office.
- put some boxes in the attic.
- figure out what to do with the zillion CDs we own.

Tuesday, March 27, 2012

well hung.

i'm talking about the shelf in our kitchen. get your minds out the gutter you pervs!

so i mentioned a while back that on our list of kitchen to-do's is adding storage space to our teeny-tiny kitchen by putting up a shelf. it took us a while, and we definitely took the long way around to get there, but now we can finally cross it off the list!

technically this project got started the weekend that my sister Abi came to visit. as a part of our IKEA run that we managed to squeeze in between all the other craziness we crammed into that weekend, i picked up a shelf that i had been contemplating for a little while. its a GRUNDTAL (dont ask me to pronounce it) and i think i like it so much because its the same kind that my mom got for her kitchen at our old house.


before we could hang the shelf, we had to wait until the painting was all done, which i mentioned wrapped up two weekends ago. what i didnt mention at that time was that we immediately wanted to hang the shelf, so on Sunday night after my birthday party with the fam, that's what we set out to do.

we decided on where we wanted the shelf to hang by having Mark hold it up and me stand back and make sure that it looked good and wouldnt be in the way of the fridge or the cabinets above the fridge, or people walking through the doorway. we marked our preferred location with pencil on some painters tape. (a trick we learned from Vanilla Ice of all people, so we werent marking directly on the walls)


then it was up to Mark to make sure it would all be secure and level. to make it extra secure, we knew it would be preferable to have at least one side of the shelf anchored into a stud, so we ended up shifting it all about an inch to the right so that the left bracket of the shelf would be centered in a stud. the right side would just have to rely on some heavy-duty drywall anchors.


well apparently, sometimes if you happen to be super strong and you put too much pressure onto a drywall anchor while attempting to attach a shelf to your wall, you can wind up pushing the whole setup (screw and anchor) straight through the drywall.

womp-womp. (there are no pictures of the holes, they were just too sad)

we had to fix this, otherwise we would not have a shelf, and that was the ultimate goal, after all. failure was not an option. so we had to open up the wall. yay for more drywall work! Mark cut an opening between the two studs where we had punched the holes. he stayed away from the corner, because that would have been a tough space to try and fix after the fact.

some random 2x4s were the key to this surgery: to beef up the stud in the corner so that when the shelf went back up it would have something solid behind it, and also to add some lateral supports so that the drywall piece that had been taken out could be reattached to the wall.


from this point on, things went smoothly. but we really didnt want to wait forever for the entire recommended time that it would take multiple coats of fairly thick spackle that we needed to fill the gaps to dry. so we bought a little fan. (we also got a memory card for my new camera when we got the fan. new camera pics for the win!) we wanted to set the fan up as closely to the wall as possible. which meant we needed to be a little creative.


yes. really.

thanks to our fan-tastic setup, the spackle was all ready to be sanded last night, AND two coats of paint went up and dried in no time flat. since we still had the original holes for the left bracket in the wall, we just had to line up the shelf, make sure it was level, mark and drill the holes for the right bracket, and attach this sucker to the wall. piece of cake.


i love this shelf. the stainless steel matches the pulls that are on our cabinets and drawers, and surprisingly enough it doesnt really make the space feel any smaller, because it just occupies an area of the kitchen that was previously just dead space.


the goal for the shelf is that is will hold some of the pots and pans that we use fairly regularly that currently reside in the clown-car that is our corner cabinet. its amazing the amount of stuff that can fit in that space, but its a pain in the butt to try and get anything through the tiny cabinet door. so hopefully with a little reorganization this shelf will be outfitted with all sorts of goodies and Mark can stop cringing every time he thinks about having to put away the clean pots and pans.


PS. how amazing is my new camera?!! it doesnt take three years to focus and take a picture, it picks up a lot more light so it uses the flash less often, everything looks less blurry, and the colors are way more true to life (except for this one, where the flash makes the kitchen look a lovely shade of banana-school-bus-yellow) best. birthday present. ever.


still on the to-do list:
- swap out all the electrical outlets, switches, and the random phone jack.
- fresh coat of paint on the cabinets and drawers.
- re-hang the light fixture.
- decide on something to do with the fake wall next to the fridge.
- move all our kitchen stuff out of the nook and back into the kitchen.

so there you have it. one step closer to having our kitchen back and fully functional!

Friday, July 15, 2011

setback #762.

cracks.

in the ceiling.

teeny, tiny cracks along every single joint.


 sigh.


we have a few theories as to why this might have happened. my first guess was that it was the water in the water-based primer's fault. and in response to this idea my loving hubband pretty much laughed at me and called me crazy.

so i changed my story, and surmised that it was all the humidity that was let in when we Mark was sanding with the windows open, and the water in the air ate away at the spackle. again, the hubs was skeptical.

and then he came up with his own theory, that since he spackled with the windows shut and the room was cool and conditioned, but then he sanded with the windows open and the room was hot and sweaty, the drywall expanded and pushed together, making all the joints look good while they were sanded. but then when we closed the windows and everything cooled down again, it all contracted again and pulled the spackle in the joints apart eversoslightly. he is very proud of his theory, and so thats the one we're going with.

and so, we have once again inserted a step into our fireplace room to-do list: RE-spackle all the joints one more time and sand them again. (with the windows shut!) and THEN we can prime and paint and all that other stuff. and then maybe? hopefully? possibly? sometime before it snows? we will have our fireplace room back? please?

Tuesday, July 12, 2011

getting closer.

are you starting to get tired of all these fireplace room updates every week without ever getting to the grand reveal? yeah, us too. which is why we just keep going. and by we, i mean Mark. because while i do things like fun projects and inviting my friends to go to the beach with me for the day, Mark dutifully stays at home and keeps working hard and making progress. i love that guy so much.

this weekend, he put up the final layer of spackle around all the inside corners of the room, sanded them all down, and started priming! as of now all the corners and edges have been cut in, the whole ceiling has one coat of primer on it, and might take a second. but we'll need to pick up some more primer before we can keep going. apparently we didnt have enough left over after we painted the two bedrooms at the end of last summer.


and in what is probably one of the most exciting developments of the past few months, the plastic was taken down off of the doorway that leads into the front room!


i may or may not audibly squeal every time i walk through the front door and i can look through the doorway into the fireplace room. and now that the doorway is open, can you see the difference between the two ceilings?

L to R: old swirly stuff, doorway, extra wall thickness, nice new smoothness

and for my extremely important contribution of the weekend, i almost finalized the paint color for the walls. i have it narrowed down to two very similar shades of a nice neutral tan color that will not blend in with the floor, not overwhelm or clash with the brick fireplace, and will work with the furniture that we have. but i will need to get bigger paint chips in order to make a final decision.


we only have two more weekends before we leave for vacation. we still have to finish priming, paint, fix the doorways, paint the fireplace doors, and maybe replace the warped mantle. i'm really hoping we can fit most, if not all of it in before then. because we're already starting to think about the celebratory cookout we're planning to have at the end of the project and oh man is that going to be sweet.

Monday, July 4, 2011

long weekend, long project.

so, the room is still not done. BUT! there is progress! we are still moving forwards and we are happy about it!

Mark spent all day Saturday and Sunday putting more layers of spackle on the walls and ceiling. all the joints, all the holes, and all the corners. thats a lot of spackle. i think we used two whole buckets.

today, Mark is sanding. we have the doors to the room completely plasticked off to contain the dust and keep it out of the rest of the house. the windows and the sliding glass door are open to try and let as much dust as possible out of the room. its a pretty good system so far. too bad it doesnt keep the hubs as dust-free as it does the rest of the house.


Mark thinks the corners might need one more coat of spackle. sadface. but once that is taken care of and all the dust is cleaned up, then we can take the plastic off the doorways and start to prime and paint and fix the doorways and put the room back together and someday hopefully maybe call this project DONE... just in time to move onto the next one.

Tuesday, June 28, 2011

spackle: tackled.

while Extreme Makeover: Home Edition was busy building a whole new house just up the road from my office this past week, in the realm of our smaller-scaled and longer-timeframed own home "makeover," we managed to find a little bit of time this weekend (in between graduation parties and church picnics) to squeeze in the next step in our seemingly perpetual fireplace room project.

Mark spent Friday evening putting all the extra screws into the wall, and he only called it a night when the box of screws was empty. also, he discovered that putting a different, larger bit (head? screwdriver-ish thingamabob?) into the drill gave him more power and saved him all the time he thought he was going to have to spend cranking down all the screws by hand. yay for a plot twist in this saga that ends in time saved instead of time wasted!


Saturday morning, Mark made a quick trip to the local hardware store to pick up some more screws and other supplies, including my very own mud tub and spackle blade! take note ladies, because i'm pretty sure that when your man buys you your very own tools so you can help him with projects, it means that he really loves you a lot and he trusts you enough to let you help. either that, or it means he just doesnt trust you being anywhere near HIS tools. but i am choosing to believe the former, and either way YAY i got to help!


 Mark put up the special joint mesh spackle tape and spackled all the joints. and do you see all those screws he put into the wall and ceiling? no? well that would be because they have all been spackled over by the spackle queen extraordinaire, yours truly. i only dropped just a little bit of spackle on the floor, only flung one blob halfway across the room, and only spackle bladed my finger enough to draw the tiniest amount of blood. i'd call that a major success.


we only had time to put the first coat of spackle up this weekend, since the grass also needed to be mowed and we had places to be because we're in such high demand, so we still have a couple more coats to put up, and then sand down, before we're ready for paint! and with a few weeknights of work and a three-day weekend coming up, i think there's a possiblilty that we could have this room done (or at least functionally complete) by the time we leave for vacation in 31 days!

also, i started two more little-er projects and almost finished one of them this weekend. here's a sneak peek:

Monday, June 13, 2011

project of the month(ish).

**Warning** this post details the most recent work that we've been doing on the house. it is LONG. but there are lots of pictures to help you follow along with the process that has taken the fireplace room, from looking something like this:


to the point at which it is now, which (SPOILER ALERT) is not yet finished.


May 10 - on a rare Tuesday night sans church league softball, Mark decides to finally start the next big project in the house. the fireplace room. plastic is taped up over the doorways into the front room and the kitchen to seal the room. baseboard is removed. trim is taken down around the doorways. the wood paneled wall comes DOWN.


studs and confusing wiring are revealed. wood and dust and nails litter the floor. it stays that way for oh, about the next three weeks.*


the next three weekends are filled with work and travel and youth group parties and weddings and grad parties and anything else imaginable that keeps us from thinking about the giant part of the house that is plasticked off. we use the front door exclusively, which is especially obnoxious when wanting to go from the kitchen to the backyard, which used to involve walking all of 5 feet to the sliding door and now requires walking through the kitchen, dining room, and front room, out the front door and the whole way around to the back of the house (71 steps, i counted), a path i now take with surprising frequency.

*in all fairness to the hubs, at some point in those three weeks he did manage to organize the mess into piles, (a tried and true method of cleaning) pick up the random nails, and vacuum up most of the dust with his new shop-vac, so it probably wasnt as bad as i made it out to be.

June 4-5 - Mark, armed only with a flashlight and (finally!) a free weekend, climbs into the impossibly tiny attic opening and crawls the length of the house along precariously placed boards in order to figure out the previously mentioned confusing wiring. good news! we now know what all the seemingly superfluous switches in that room do! (the secret is that TWO of them control ONE outlet) new switches and outlets are purchased and installed. all the old paneling and nails get taken to the dumpster. light fixtures are taken down to prepare for the next step: drywall.

June 11 - a month and a day after the initial steps were taken on this project, we have real, tangible progress to share! the ceiling went up! and oh, if only it were really that simple.

we first realized what kind of a day we were in for when, first thing in the morning, we discovered that the truck we were supposed to borrow forgot that we were borrowing it and went out of town for the day instead. so instead we rolled into the parking lot of our local big-box store in a big ol' van. because nothing says "we are serious about our home improvements" like a conversion van.

i'd like to extend a big thanks to the random man in the green shirt for taking pity on poor weak little me and helping the hubs get all 16 sheets of drywall onto our cart.


and i'd like to thank everybody in the parking lot for not stopping to point and laugh as the hubs and myself tried to figure out how exactly to fit said 16 sheets of drywall into said conversion van, a process that ultimately ended with the two of us hardly speaking to each other as i ran around the parking lot barefoot as we frantically tried to load everything up. and oh yeah, did i mention it started RAINING?


we thought our day was over right then and there. but fortunately for us, the rain didn't last long, we got over ourselves and were actually thankful that the van kept the drywall dry as we drove, and by the time we got home the sun was shining and we were ready to get going!

the only thing we had forgotten to pick up was a straight-line-snappy-chalk-box thing. so i volunteered to run to the local little hardware store to get one. i found one without even having to ask for help, and i headed home with my find. and then i went back 10 minutes later to get the CHALK for said chalk box. because apparently they dont sell the boxes with the chalk already in them. who knew?

another HUGE thanks goes out to Mark's little brother, who got drafted volunteered to help out with the heavy lifting. he made the whole process a lot smoother than if i were the one on that ladder.


or lets just be honest, there's no way i could have done that. we literally could not have done this without you, Dan.


unfortunately, we only had our heavy-lifting-help for a few hours, so we decided to sacrifice a little bit of quality in an effort to keep moving quickly, because as previously mentioned, the full pieces were not going up with me as the helper on the ladder. so instead of having staggered joints, we ended up with this one neat-looking long joint down the length of the room.


this, of course, led to another set of issues, as this joint was apparently set on the mystery vanishing joist of doom, which led to some extremely frustrating moments, a lot of wasted screws, and at least one spot that looked something like this:


but since we were determined to get to a good stopping point before we finally called it a day, we pressed on through phantom joists and mis-measurements, and FINALLY the last piece was up, and the last screw (for now) was put in.


we celebrated by going out for dinner because after putting 11 pieces of drywall onto the ceiling and dealing with all the little issues that kept cropping up throughout the day, we were both too mentally exhausted to make dinner. and also, we needed to go back to the store for more screws. so we could put up some MORE drywall the next day.

June 12 - the wall goes up! again, it sounds so simple when you say it that way. when you leave out the fact that we were already tired from the day before, we pre-gamed for this project by volunteering in the church nursery and mowing the grass,  and we had a whole 'nother slew of little issues to uncover as we went along.

the first piece went up with little to no issue:


but the rest just seemed to be one crooked line after mis-measurement after bad cut after another. these were each dealt with in turn with a sigh, and a popsicle break.


also, this happened:


(no groundhogs !in the wild! were actually harmed during the course of this project)

the most major frustration of the day came with the realization that we had not accounted for the fact that in replacing the 1/4" paneling with 1/2" drywall, we would actually be making the wall thicker, which would cause us issues when it came to the doorways. so we can just go ahead and add 'fix the doorways' to the to-do list for this project. 


so 5 pieces of drywall later, and the wall is covered now too! i'm pretty excited about the progress, even though i know that there is still a fairly long way to go between where we are now and the point at which we can tentatively declare this project to be finished.


still to do on this project:
- put in a LOT more screws in both the ceiling and wall.
- mud and sand all the joints and screw-holes.
- prime and paint the walls and ceiling.
- paint the fireplace doors.
- fix the doorways.
- put up the trim.
- move the furniture back in.


so you see why it wouldnt be possible to share the ENTIRE project in just one fireplace-room-project post. its just too big of a project with too many steps and too many things to share. but we're excited with the progress we've made, and given a few days to mentally recover from the more frustrating points of this weekend we'll probably have even more progress to share soon!